: Targeting the ball")
Tennis Street is an arcade game about tennis. During this series we'll explore a model we can use to simulate the sport so that we can have our two tennists throwing a ball at one another on the tennis court:
During the 4 posts we'll explore the following:
- Setting up the court and making the ball behave like a ball.
- Determine where we want the ball to go.
- Launching the ball where we want.
- Hitting a ball that was thrown at a player.
Shooting angles
In the first post, we covered how to model the court zones and how to make the ball behave like a ball. Now, when a tennist hits the ball: in what direction do we want the ball to go? Let's figure that out. Consider the following diagram:
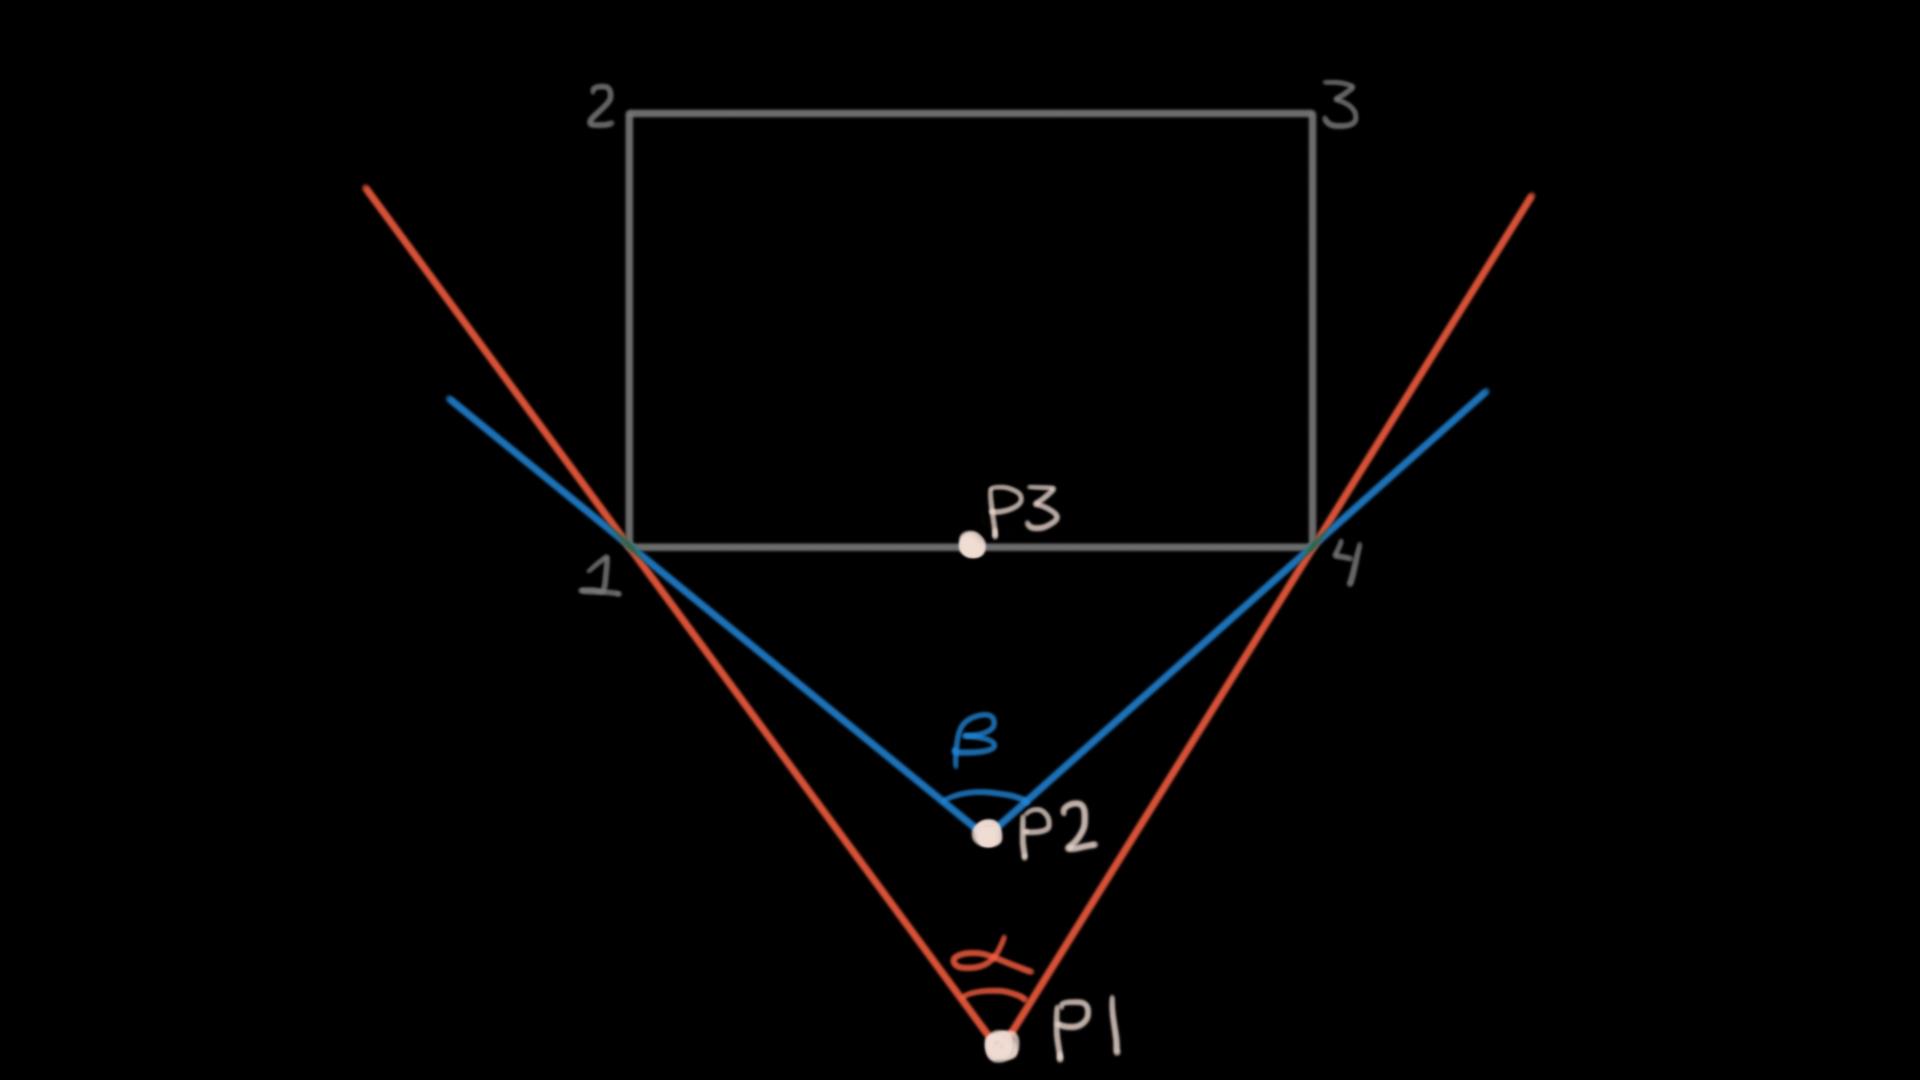
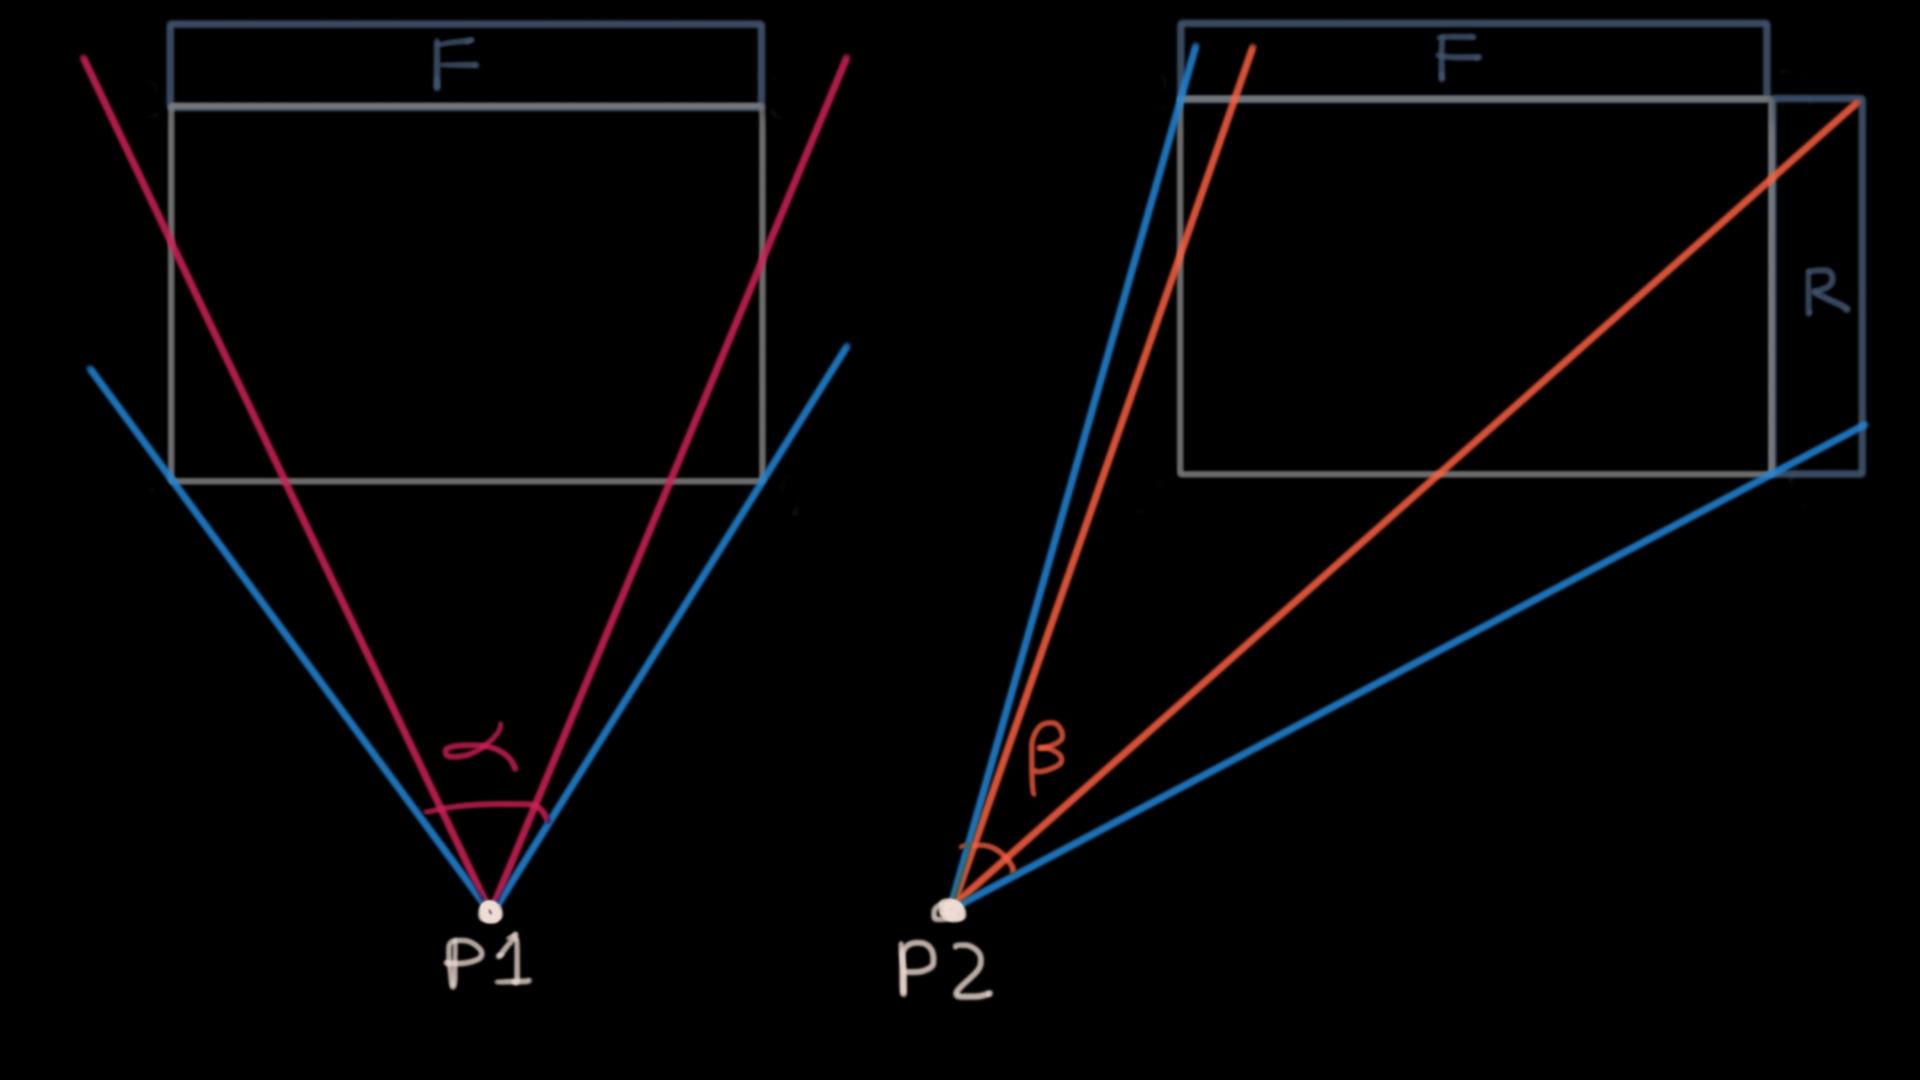
The grey square represents the current region we need our ball to land in (target square). 1, 2, 3, and 4 are just the vertices of the target square. P1, P2, and P3 are three spots where we may shoot the ball from. On P1 we are farther from the target square compared to P2. Notice this means the angle α is smaller than β. What do we make of this difference? Well, if you launch a ball from P1 you would have a smaller angle compared to launching from P2. This means that there are more possible directions you can shoot the ball at from P2. Notice this also means that if you were the tennist receiving the ball, you'd have to cover a bigger angle for a ball shot from P2. Notice that the closer we get to the court the bigger the angle becomes. When you get as close as you can without breaking the rules you'd be at P3, where your possible launch angle is 180 degrees.
Does that mean that shooting from P2 is a better strategy than shooting from P1, and shooting from P3 is an even more powerful strategy? Strictly from the angle perspective, it is - but there are other things to consider. For instance, the closer you are to the target zone, the less time you have to react and prepare your shot and you become vulnerable to some types of shots. But if we're making an arcade simulation our tennists could have button-mashing-level reflexes, and this can become a balancing problem. We can consider this problem later on.
Diagonal angles
Now consider the following diagram:
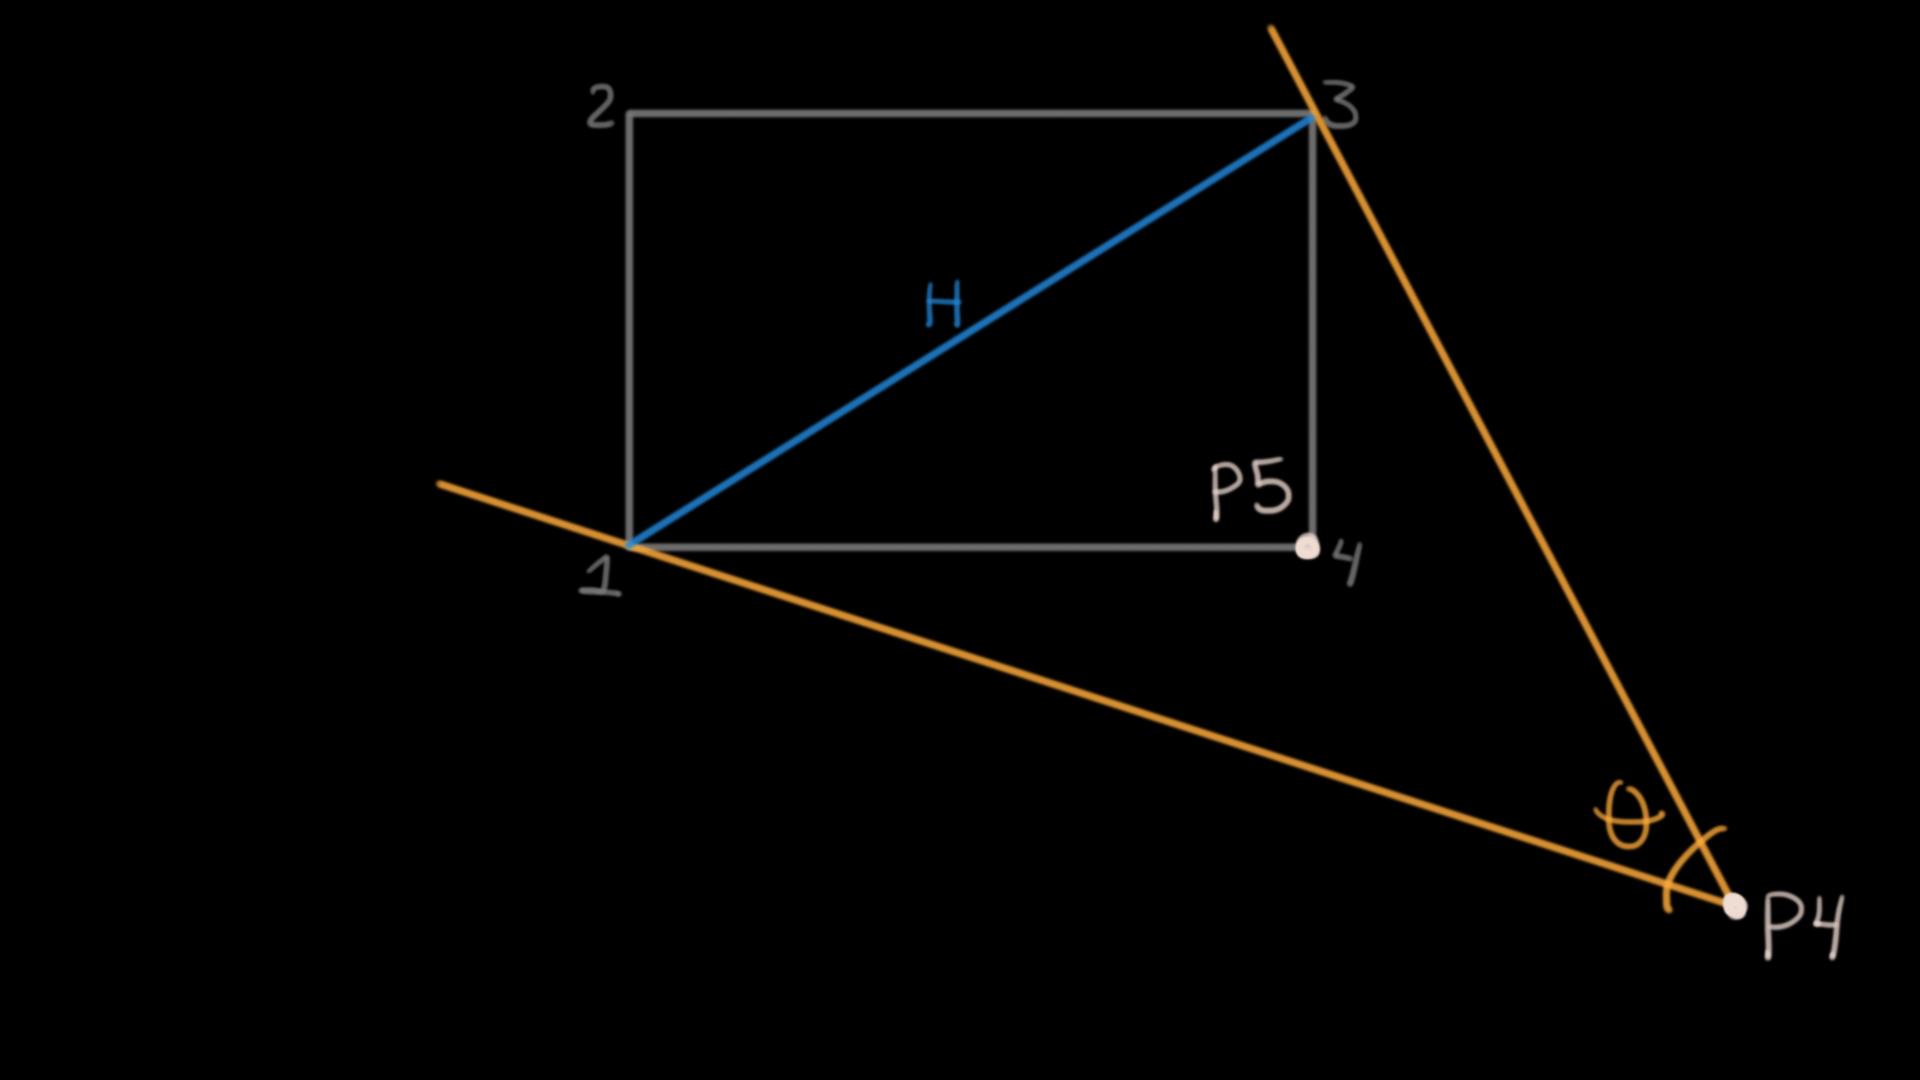
P4 has some interesting characteristics. The main difference is that we are looking at the court from a different angle, so now our biggest possible angle is constrained by the target zone's vertices 1 and 3, where P1, P2, and P3 were constrained by 1 and 4.
Recall that in the previous setup, if we were to walk from P1 to P2 to P3 our shooting angle would become ever bigger until it became 180 degrees. If we get as close as we could to the target zone while maintaining 1 and 3 as the vertices constraining our shot angle notice we'd end up at P5. Notice that our shooting angle at P5 is a rect angle (90 degrees). This is the biggest shooting angle we can muster while having 1 and 3 as our constraining vertices. If we wanted to get the same angle P3 had we'd have to walk all the way up to H, but that's inside the opponent's side of the court (we are not welcomed there).
180 is certainly bigger than 90. What does this imply? Is the optimal strategy to just try to hit the ball from a place as centered and as close to the opponent's side of the court as we can muster? Not so fast. First, we cannot select the direction the opponent will choose their ball to go. Second, while shots constrained from the vertices 1 and 2 can have a bigger angle than shots constrained by 1 and 4, we already discussed some reasons why being in the face of the opponent is not always your best move.
Cone intersections
Say you wanted to send the ball at the zone Z from either P1 or P4:
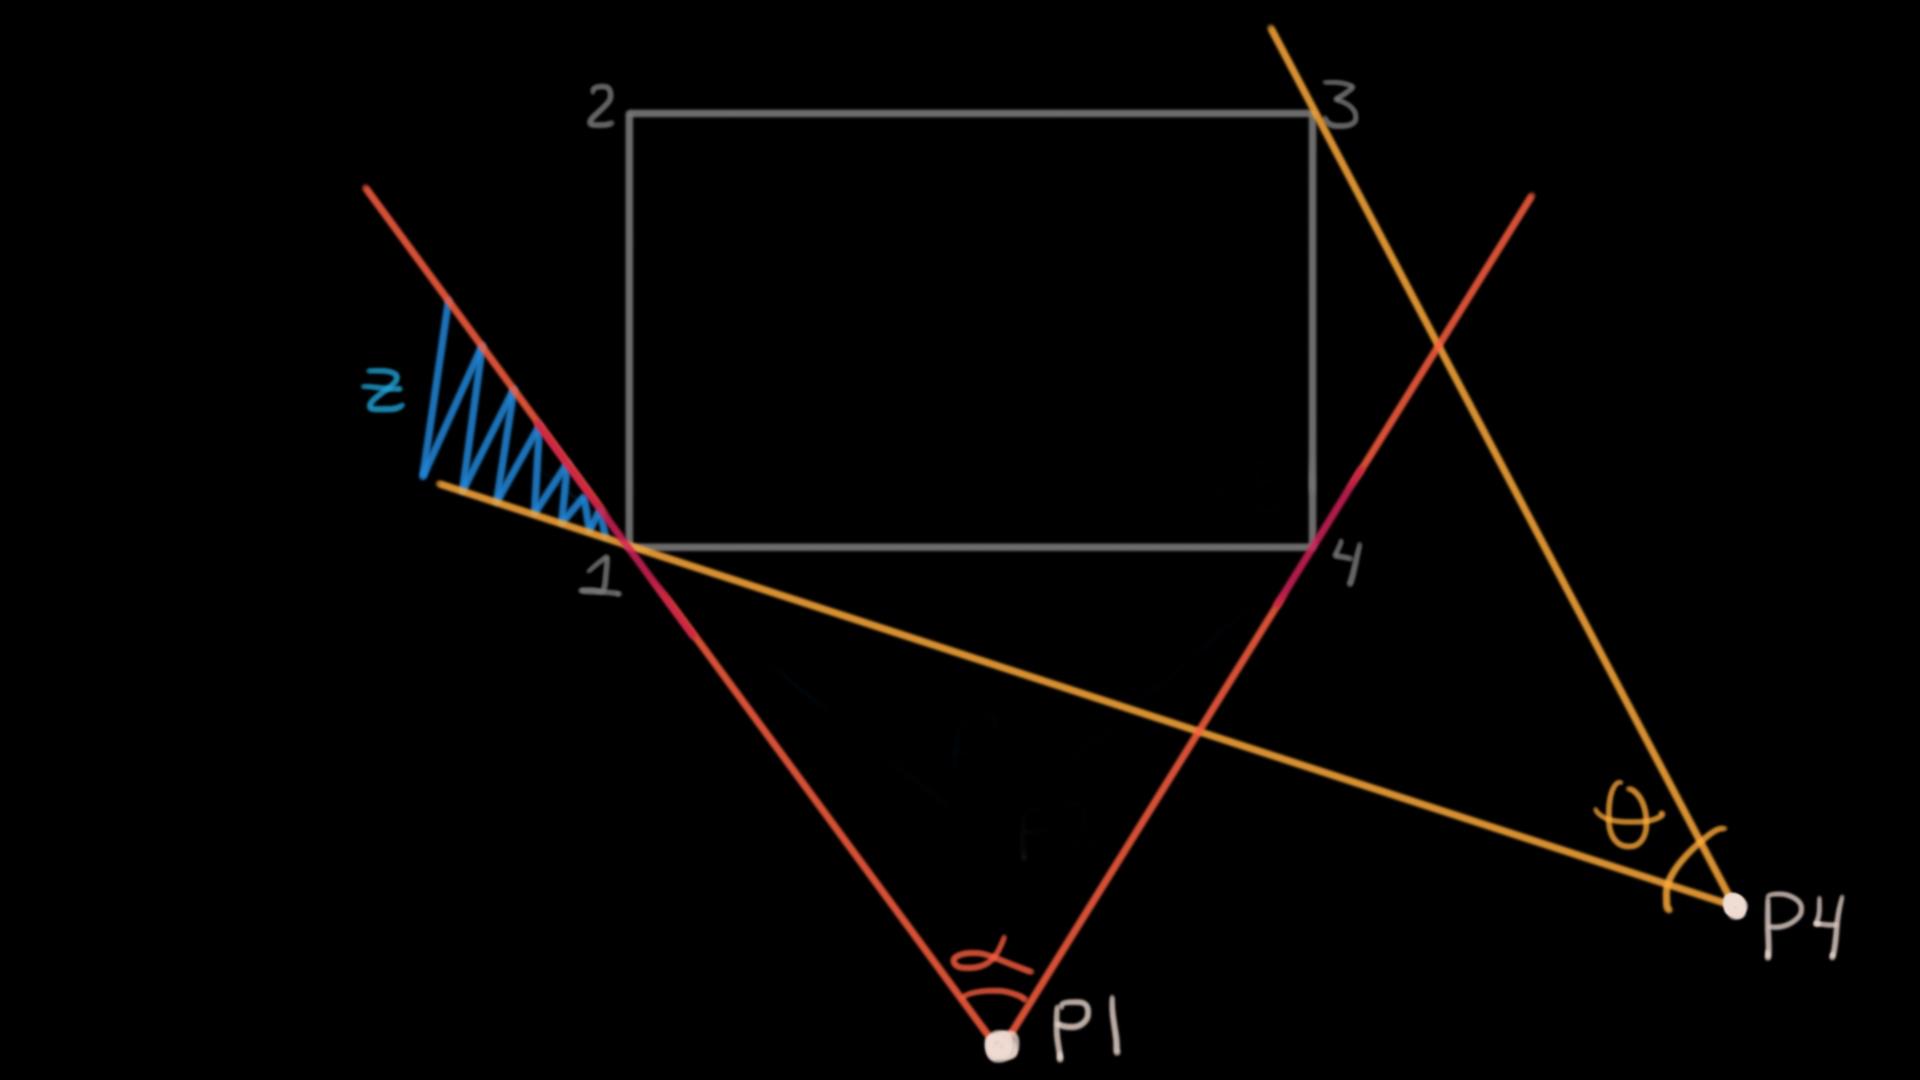
Notice that there's no straight path starting from P1 inside the angle α that can reach this zone Z. There are, however, multiple straight paths from point P4 that can launch a ball into this zone Z. This is because the area covered by the cone described by the shoot positions PX and their respective angles are never the same, and sometimes the areas do not intersect. Notice that this means that if you're waiting to answer a ball shot from P4 you need to cover a different area of the court than if you were defending a ball sent from P1.
Corners and errors
Let's now consider a new problem:
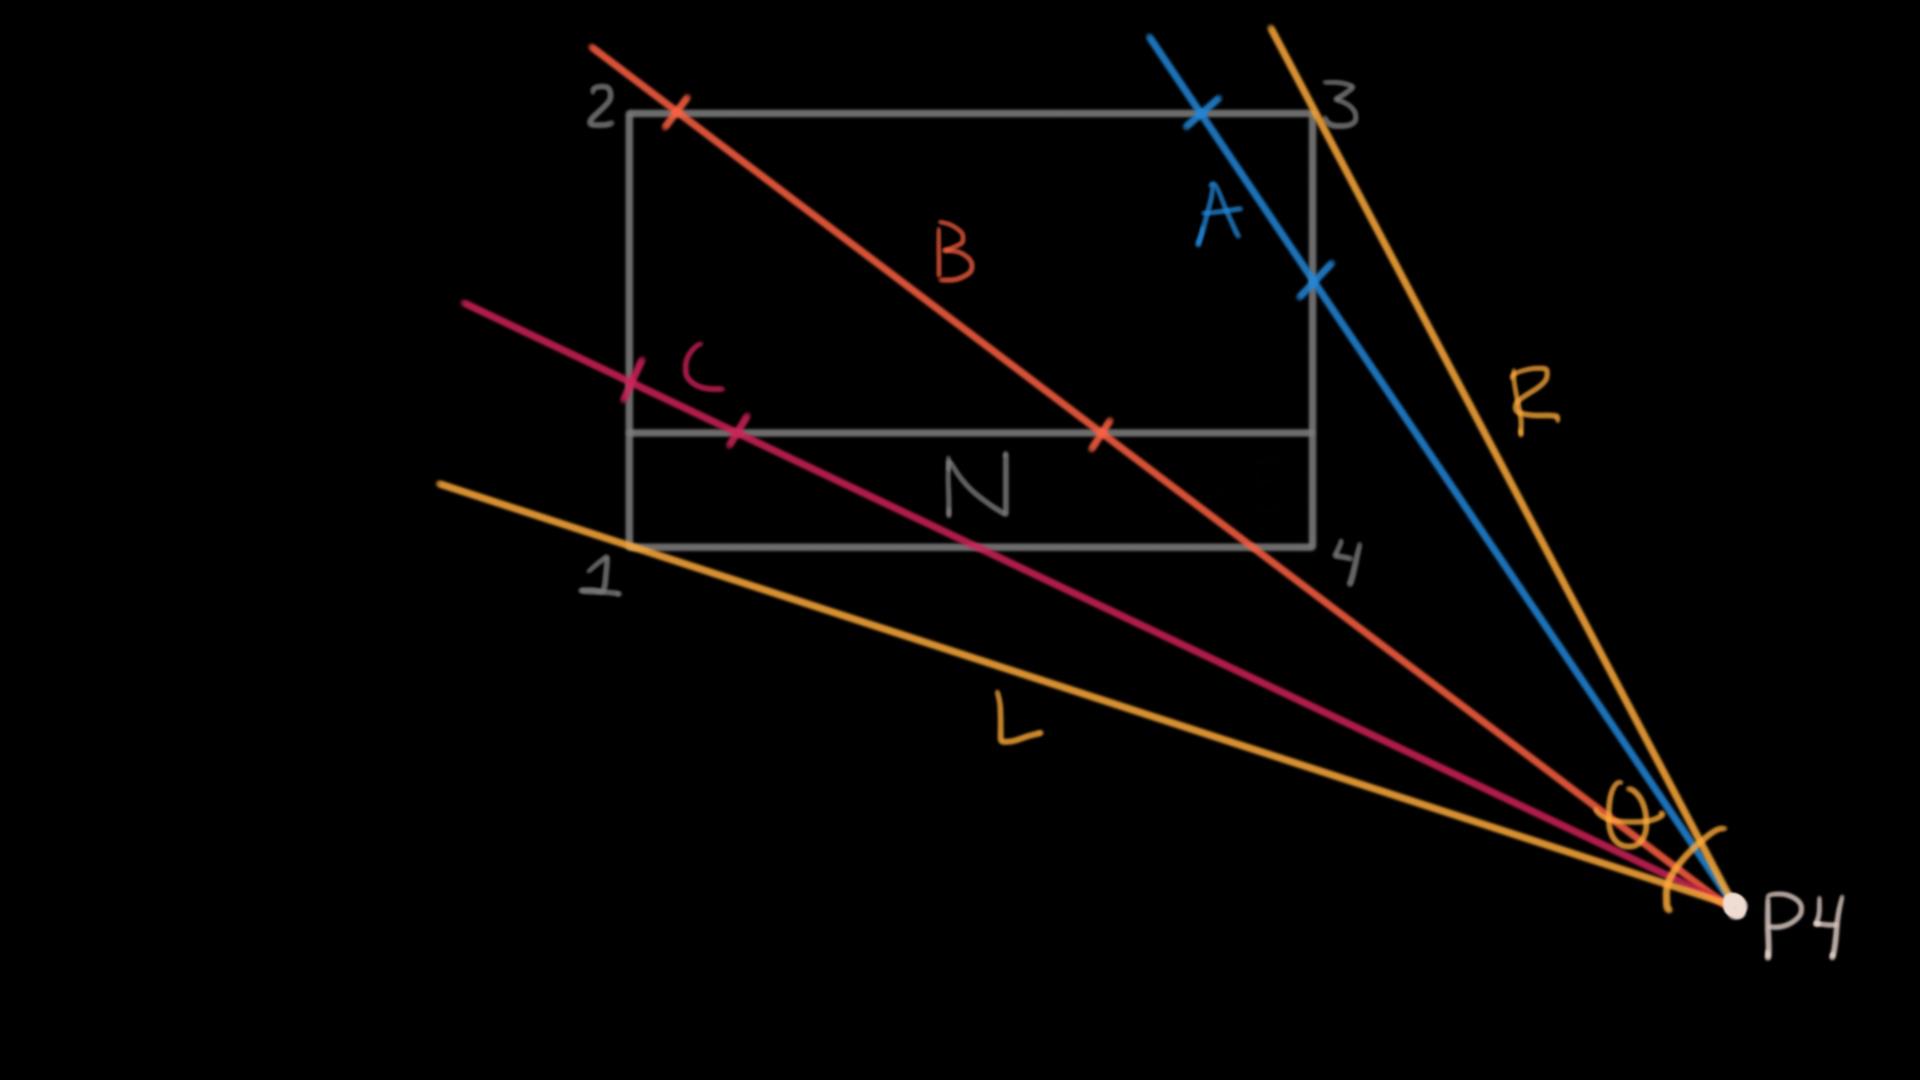
We have the P4 shooting position again, where its range is described by θ. Consider the blue trajectory that contains the line segment A. If you were a real-life tennist it would be less risky to make the ball land inside the segment A compared to making it land precisely at the point 3, which part of the trajectory R. There is just more room for error in the blue trajectory than in the trajectory R - it's a safer path. Now consider the trajectory L, whose only point inside the court is 1. Compared to R this is even a worse trajectory because you can't even land the ball in 1 - the net is right there! The squared region N represents a squared region that you're not likely to hit because for the ball to land on the court it needs to go past the net and it needs some distance to be able to drop to the floor. The red trajectory with segment C represents a trajectory close to the net. Notice that the net creates a problem for trajectories close to 1 when shooting from P4. Finally, consider the orange trajectory with segment B. Notice that even while taking into account the region N, B is bigger than A and C by a considerable margin.
What do we get from all of this? Well, in the real-life tennists know that trajectories like B have a bigger error tolerance, these are called "cross-court shots", and they are often used to play it safe. The risk associated with the different zones of the court is something tennists have to factor-in in their decisions, but if we're making an arcade simulation this is not an inherent problem because we can simulate really precise tennists. So we can either ignore or simulate this, depending on the experience we want to create - depending on the problems we want our players to solve.
An arcade experience
Arcade games from good ol' arcade machines were designed to implement a business model where players constantly adding coins to the machine was the ideal scenario for the machine owners. So games were designed to be played in short sessions and tended to be fast-paced, easy to jump into and hard to master - so players could only get so far with a single coin.
We've so far discussed some angle-related considerations in tennis, and some of the ways in which a simple simulation may be different from the actual sport. We may not care about simulating some aspects of the sport, though. What we want to simulate depends on the experience we want to create.
As I mentioned, in Tennis Street I wanted to go with an arcade experience. The two important pillars from that type of experience in my case are: fast-paced and easy-to-jump-into. I don't really need to create a super hard game, since I'm not planning on milking any kid's coins. How does this translate to the tennis simulation?
Tennis Street aims to be a fast-paced tennis experience. We want to have rallies that are exciting and fast. Our simulated tennists may therefore have super-human reaction times and precision when hitting the ball. How fast and how precise is something up for balance, but whatever the balance - it's good to have variables to tweak when doing the balancing.
Enabling rallies
Here we have two shooting positions, P1 and P2. Shots from different points in the court have different angles and different possible trajectories. As we've seen, some trajectories have high risk in the real world, but that may not be inherent in our simulation. If we don't, in some way, reduce the angles or precision of our tennists we could end up with virtual tennists who shoot balls as if they were bullets: rallies could last a few seconds if not properly balanced. To counteract this we can either give our tennists super-running-speed or reduce the angles they have available (and their available shot power). Simply solving the balance problem by altering the player speed restricts our ability to fine-tune the experience, so we definitely want to have control over angles. Even without talking about balance, having control of the available angles can allow us to create a variety of shots by simply changing the values.
Consider the maximum angle that P2 has available. Notice that the zone R is available, so from this shooting position we can send balls into that zone. Let's for the sake of argument assume that the receiving tennist is only fast enough to return a ball sent to zone F. If we want long rallies we may need to reduce the possible shot angle from P2 until it resembles β. See how the section that you need to guard when receiving a ball shot at P1 with maximum angle α is similar to the region you need to guard when receiving a ball shot at P2 with max angle β. Notice that when defending shots with angles α and β you don't really need to worry about the zone R.
Allowing the left and right portion of the cone to be asymmetrical can allow us to balance the game in this fashion - if we want to we could have our tennists mostly defending zone F. How big or small the zone F is, is a function of many variables. Balancing them will surely take some playtesting.
In the next post, we'll see how we can model the angle reduction so we can balance the game in this way, we'll discuss how to determine the final spot we want our ball to land on, and we'll finally send that ball flying!
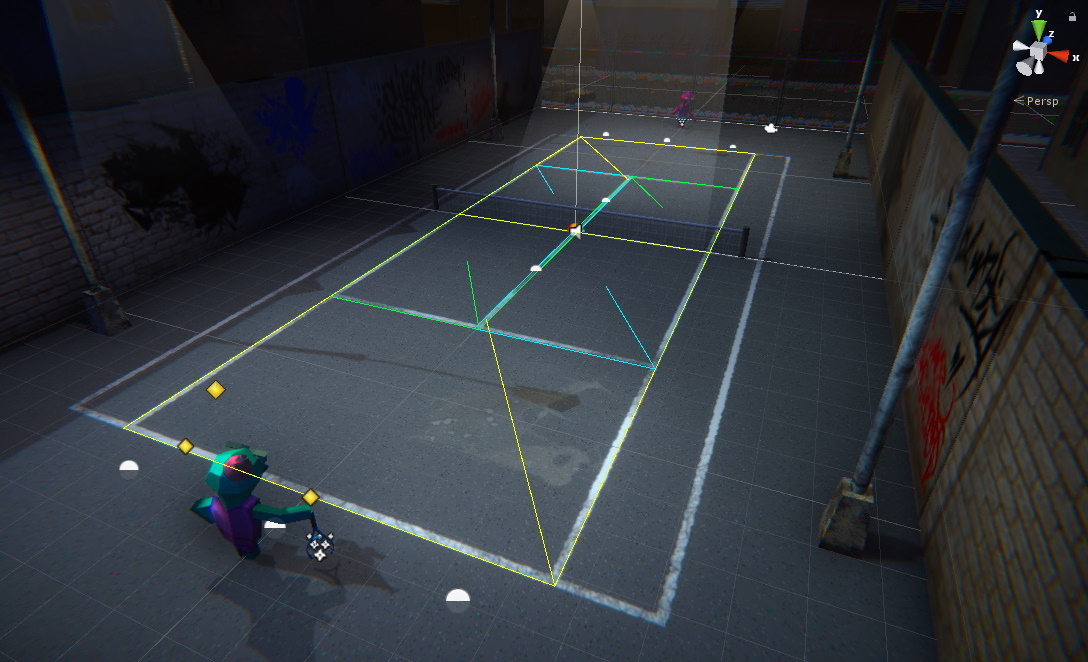
: The ball")
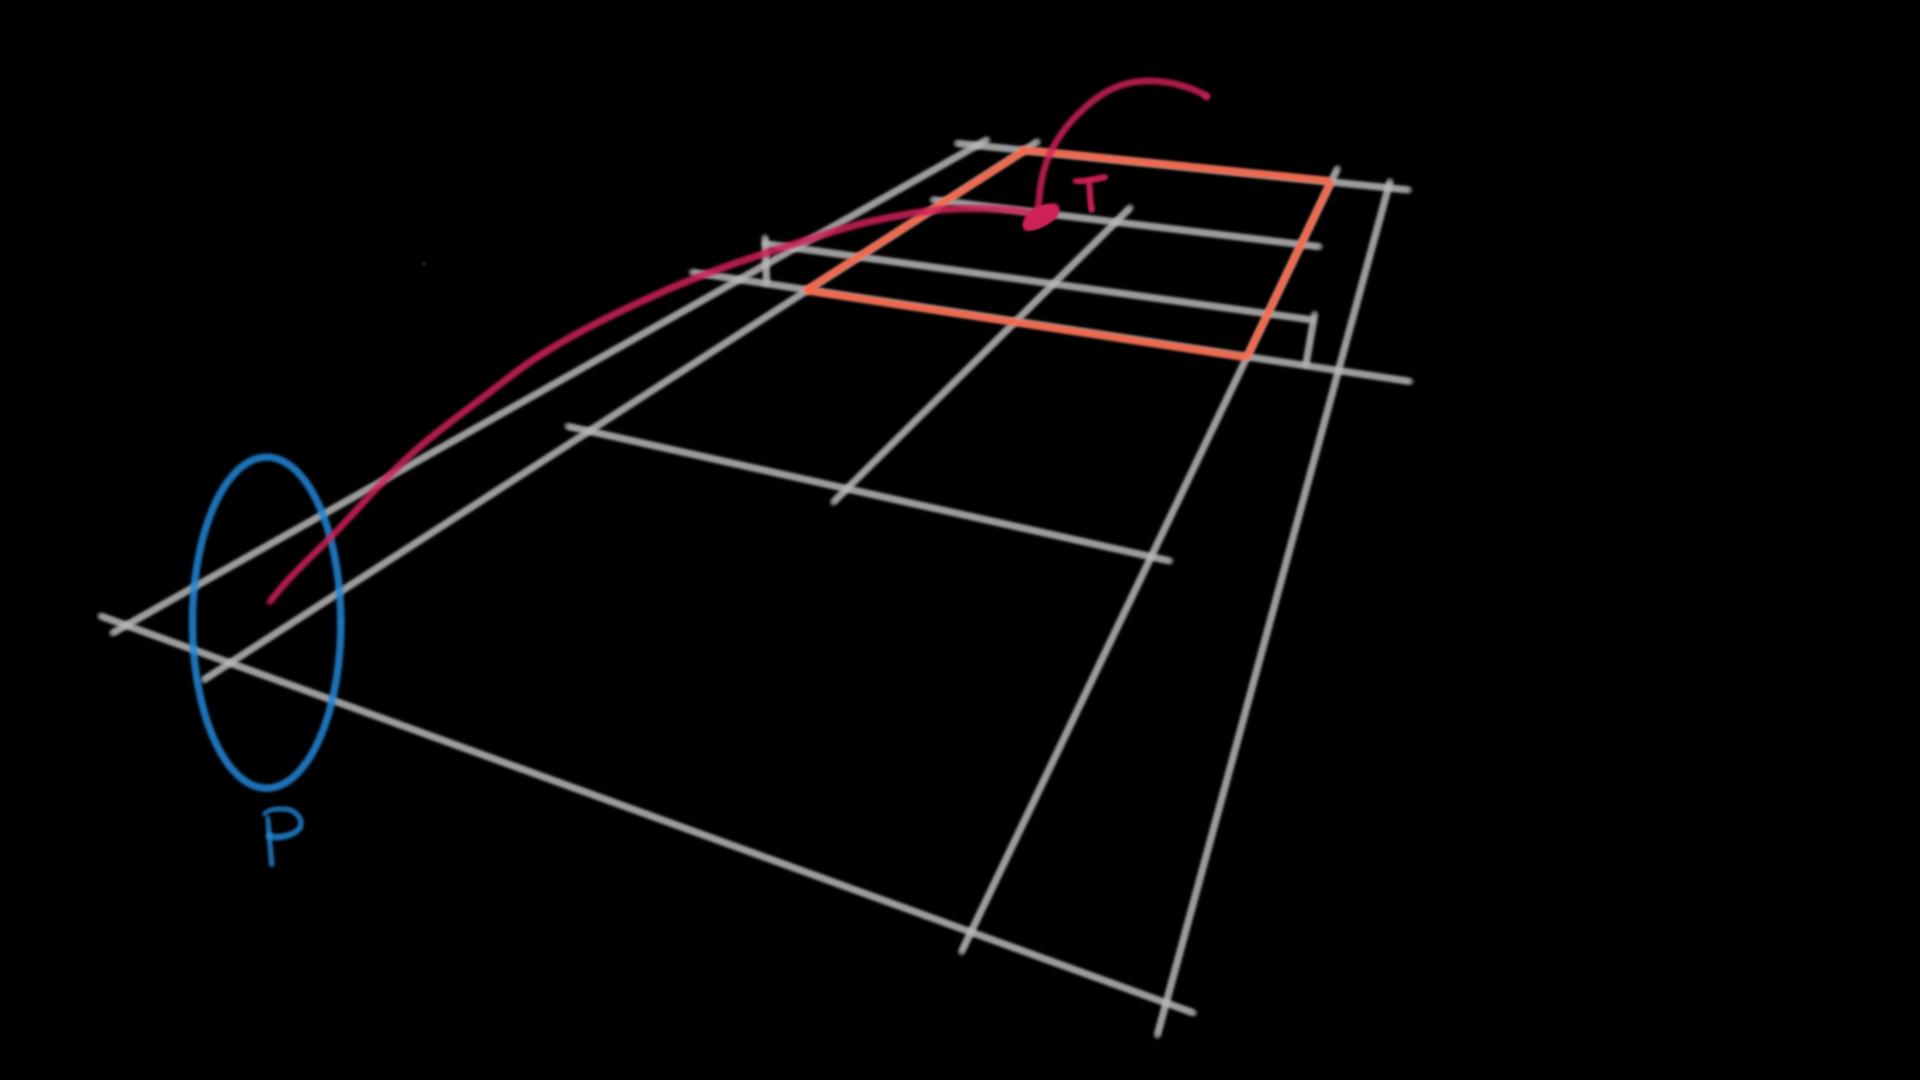 In grey, you can see the court. P is the player currently throwing the ball. In red, you can see the current ball's path and T is the place where the ball initially lands.
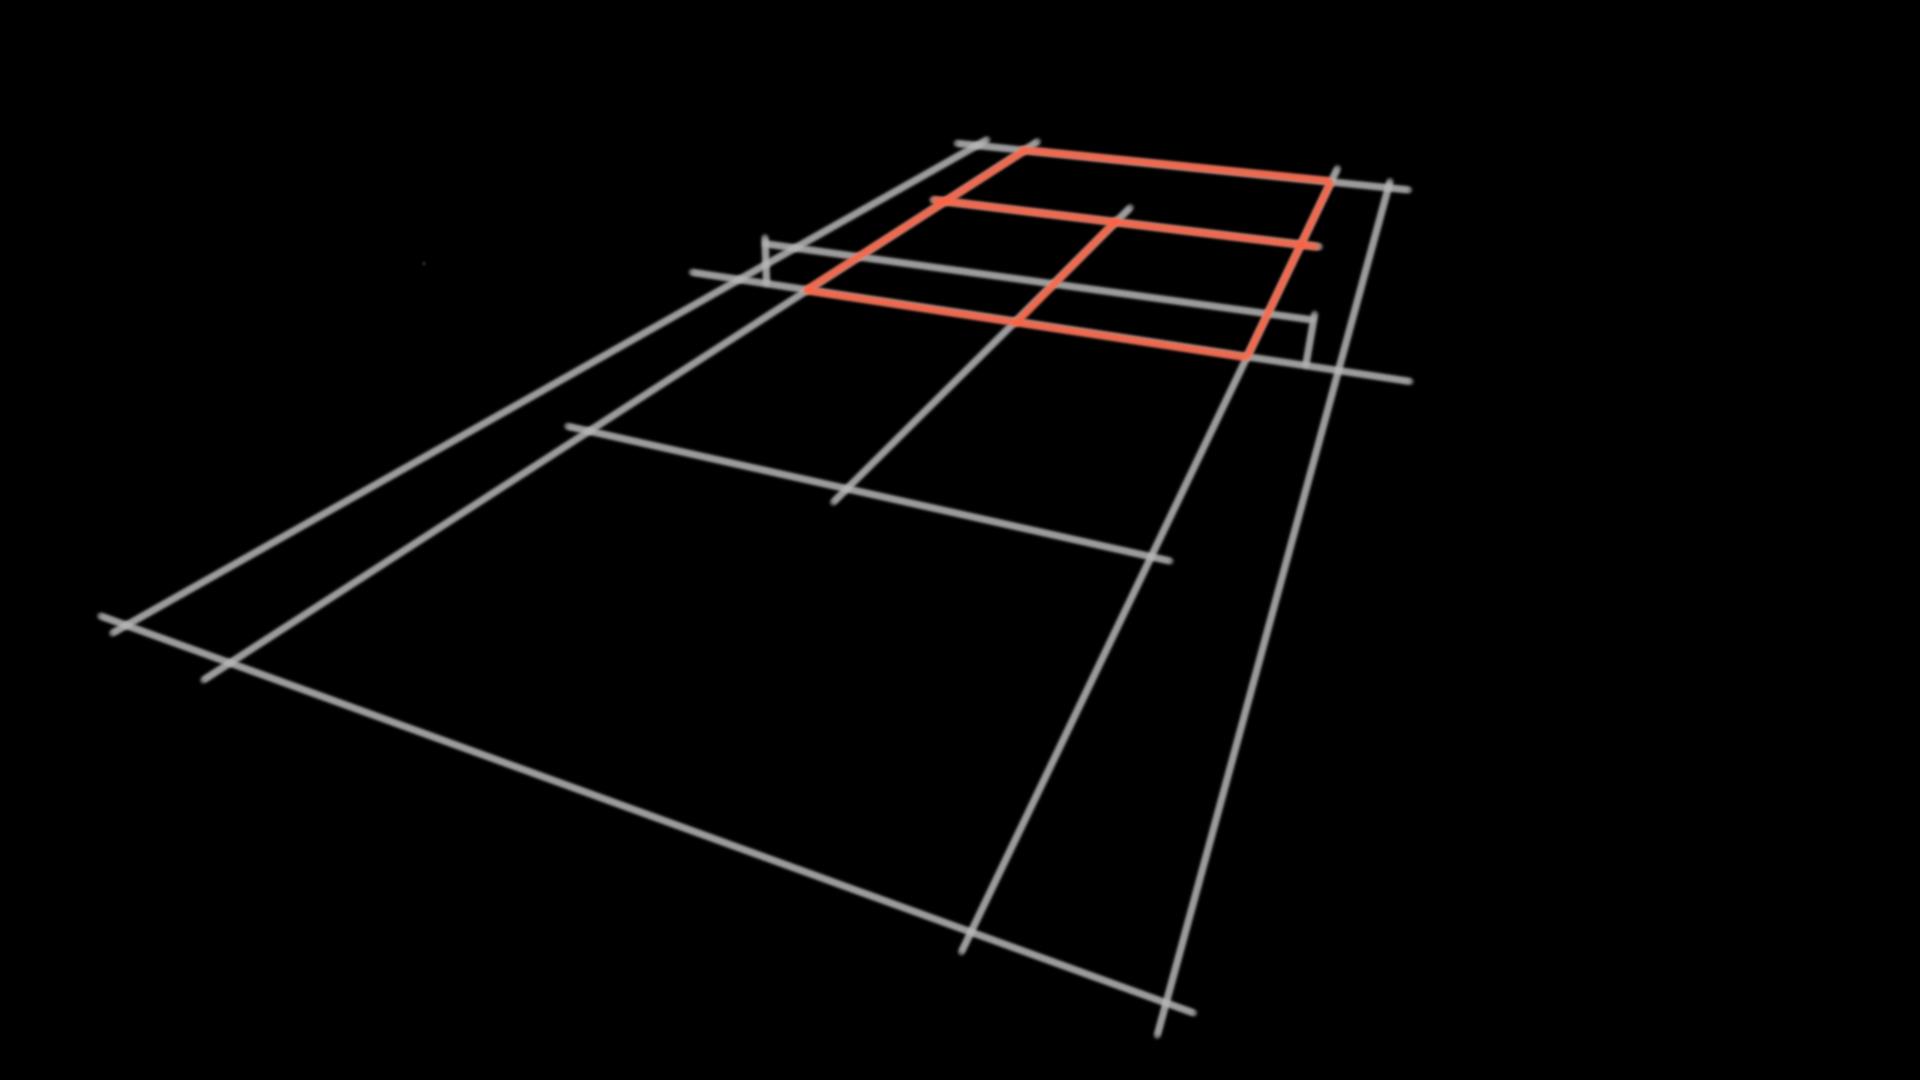
 Unity has a class called